The goal is a private learning environment for AI Agents for Beginners and future agent engineering articles. Our first test adapts Microsoft’s Your First Agent tutorial. We keep configuration in .env and authenticate with a dedicated service principal. Budget and quota settings support this setup; the main milestone is running hello_agent.py.
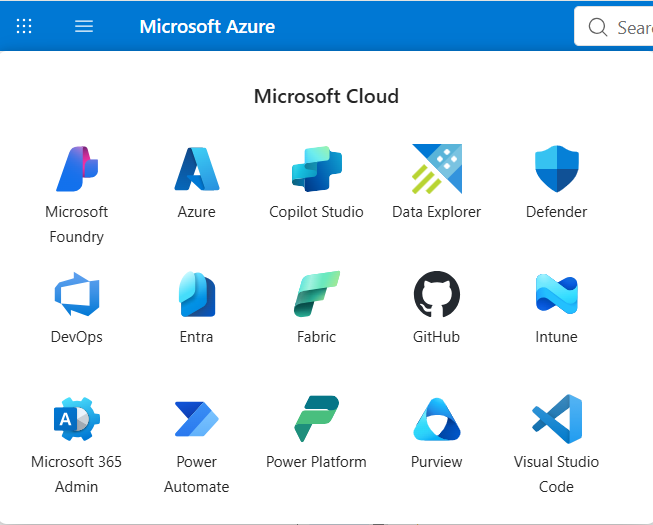
Our practice environment in Microsoft Cloud
This practice brings together three parts of Microsoft Cloud: Azure (subscription, resource group, Access control/IAM, Cost Management budgets), Microsoft Foundry (project, model catalog, quota, model deployment and model playground), and Microsoft Entra ID (app registration, service principal, client secret and security group). VS Code provides our local Python editor and terminal.
The Foundry model playground lets us send a short test prompt after deploying yantras-luna-model, before calling it from Python. It helps check that the deployment responds; the Python test separately verifies our service principal and local configuration. Playground requests can incur model usage charges.
1. Prepare a Python workspace
This walkthrough uses Windows and VS Code. Install Python, Git, VS Code and its Microsoft Python extension. Use a Python version supported by the current Agent Framework packages. You also need an Azure subscription and permission to register applications, deploy models and assign roles, or help from an administrator.
python --version
git --version
mkdir yantras
cd yantras
code .
In the VS Code terminal, create an isolated environment. Select Python: Select Interpreter from the Command Palette and choose the interpreter inside .venv.
python -m venv .venv
.\.venv\Scripts\Activate.ps1
python -m pip install --upgrade pip
python -m pip install python-dotenv agent-framework azure-identity
If PowerShell blocks activation, use the environment’s interpreter directly: .\.venv\Scripts\python.exe -m pip install python-dotenv agent-framework azure-identity. Use that interpreter to run scripts too.
The first-agent tutorial uses the narrower agent-framework-foundry package. We install the broader agent-framework metapackage for our learning workspace. The tutorial explains that both provide the core framework; the Foundry integration is needed for this client. Installation reference.
2. Create a Microsoft Foundry project
Open Microsoft Foundry, select Create project, and follow the wizard. Confirm the subscription, resource group, region, Foundry resource and project name before creating them. Portal labels can change; retain these relationships when following the screens.
On the project home page, locate the Project endpoint. Keep it locally for the configuration step. It has a project-specific path, unlike the separate Azure OpenAI endpoint.
Instructions, tools and knowledge
View deployments
https://*****.services.ai.azure.com/api/projects/**********3. Give the application its own identity
Azure Identity supports local developer sign-in and application identities. For this exercise, we chose a service principal: it separates application permissions from a personal account and allows authentication without Azure CLI. Microsoft recommends Microsoft Entra token authentication for Azure services. Authentication overview.
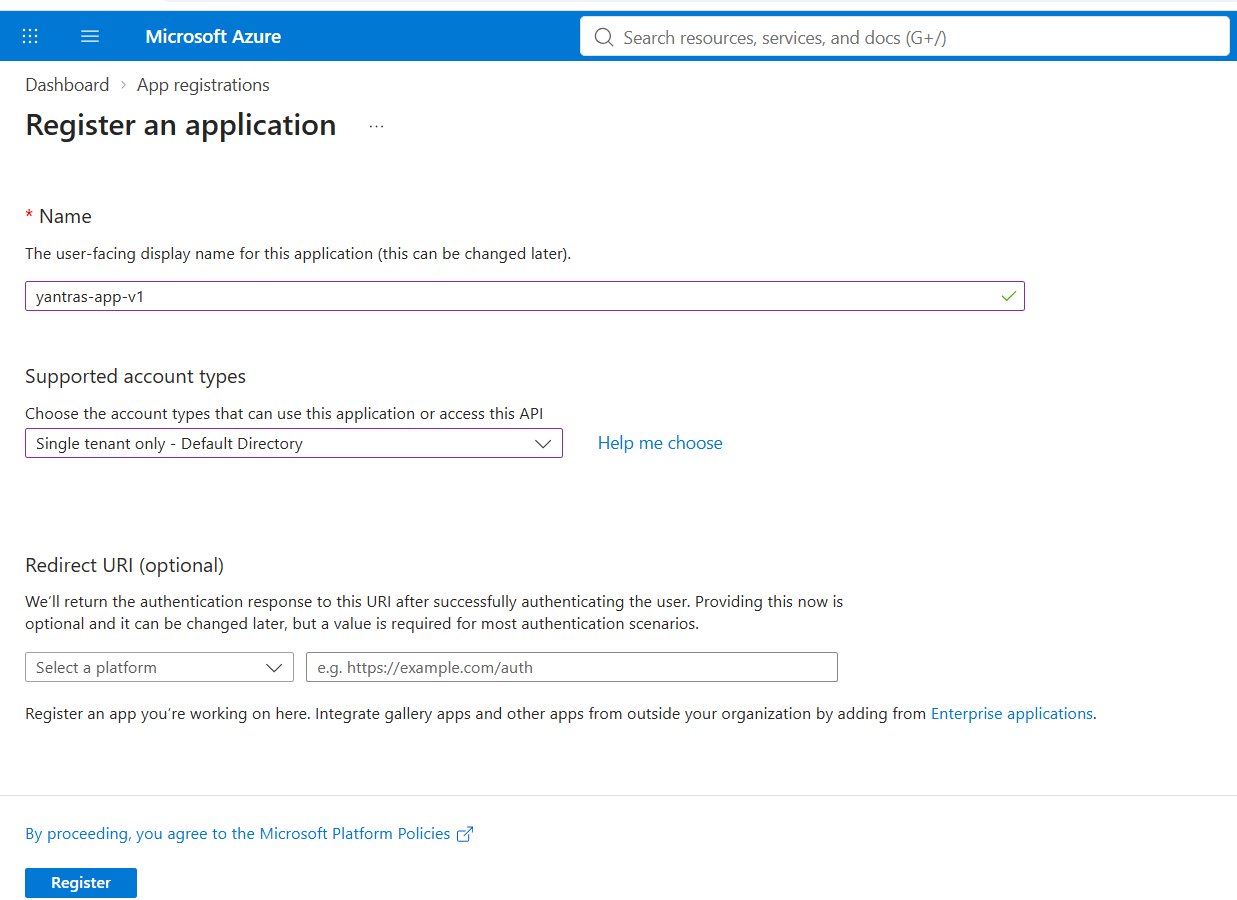
- In Azure portal, open Microsoft Entra ID → App registrations → New registration.
- Name the application
yantras-app-v1. Select the single-tenant option for this tenant-specific exercise; an interactive redirect URI is not needed for this client-secret flow. - Select Register. Copy the Application (client) ID and Directory (tenant) ID to your local configuration.
- Open Certificates & secrets → Client secrets → New client secret. Choose an expiration consistent with your organization’s policy.
- Copy the secret’s Value immediately. The secret ID is not the credential value.
A secret expires and must be protected and rotated. Keep it outside source control. When hosting on Azure later, prefer managed identity where supported. Microsoft’s local service principal guide describes registration and configuration.
4. Create a group and grant access
Authentication identifies the app; authorization determines what it can do. Our first service-principal request returned 403 because creating an identity alone did not grant Foundry access.
- In Microsoft Entra ID, open Groups → New group.
- Choose Security, name it
yantras-group, and use Assigned membership. - Add the enterprise application/service principal
yantras-app-v1as a member, then create the group. - Open the Foundry resource in Azure portal, then Access control (IAM) → Add role assignment.
- Select Foundry User, which may still appear as Azure AI User. Under User, group, or service principal, select
yantras-groupand complete Review + assign.
Application identity→yantras-group
Security group→Foundry User
Resource access
Our session assigned the role at resource group scope, which is inherited by its Foundry resource. For a focused setup, prefer the narrower Foundry resource scope when sufficient. Allow propagation time and restart Python before retrying. Role assignment requires an account authorized to grant Azure roles. Foundry role and scope reference.
5. Set a budget and request model capacity
Before testing, decide how much you are willing to spend. Our deployment is private, but repeated requests and future agent loops can still incur charges.
Create monthly email alerts
- In Azure portal, open the tutorial’s resource group, then Cost Management → Budgets → Add. Use subscription scope instead to monitor its entire spend.
- Confirm the scope, name the budget
yantras-learning-monthly, select Monthly, and choose start and expiration dates. - Enter an amount you can afford. For illustration, use 20 in the displayed currency; this is not a cost estimate.
- Select Next and create three Actual cost conditions: 50%, 80%, 100%.
- Add your email recipient and language; optionally add a 100% forecasted-cost alert.
- Select Create and verify the saved scope, dates and recipients.
Request quota for GPT-6 Luna
For this walkthrough, we selected gpt-6-luna / Global Standard. Check its availability and quota for your subscription before deploying.
- In Foundry, select Manage → Quota → Token per minute.
- Check the subscription, region, model and deployment type. Existing unused capacity may avoid the need for an increase.
- If capacity is zero or insufficient, select Request quota. Choose gpt-6-luna and Global Standard.
- For field 15, which asks for total quota in kTPM, our initial target is 30: 30,000 tokens per minute total. This is our learning-workload choice, not a universal requirement.
- Describe the workload: private personal training, technical writing, one developer, and future multi-agent experiments. Submit and await review; approval and timing are not guaranteed.
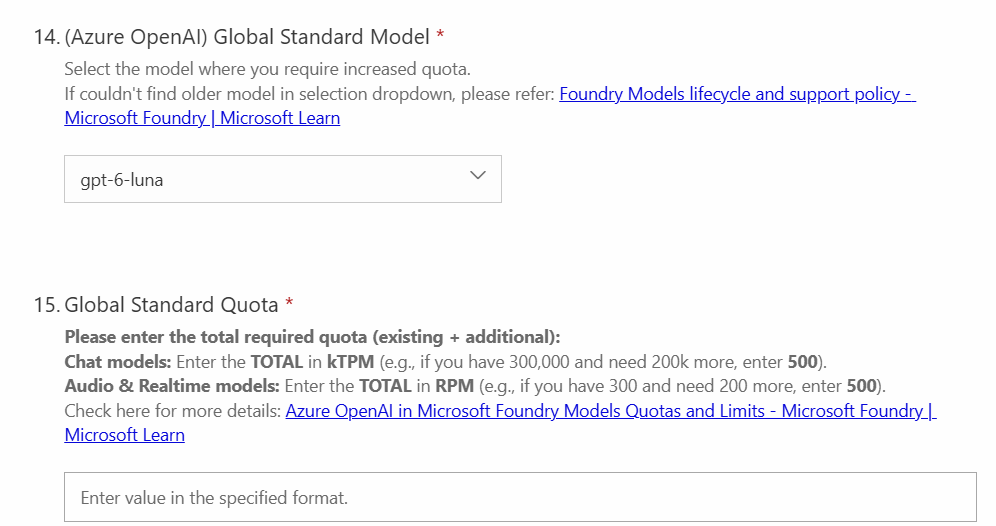
Quota limits throughput, not monthly spending. RPM follows model-specific capacity ratios. Approval does not create a deployment. Microsoft quota reference. Once approved, allocate only the capacity needed for current tests and bound retries, tool calls and agent loops.
6. Deploy the model
- Return to Build → Models → Deployments and select Deploy a base model.
- Select
gpt-6-lunaand the approved Global Standard option. Verify the intended Foundry resource, regional availability, quota and displayed pricing. - Enter
yantras-luna-modelas the deployment name and complete deployment. - Wait for provisioning to succeed, then test a short prompt in the playground.
| Purpose | Value |
|---|---|
| Application identity | yantras-app-v1 |
| Base model | gpt-6-luna |
| Deployment used by Python | yantras-luna-model |
Use the deployment name, not an arbitrary model catalog label, in the Python client. This missing deployment caused our next error: 404 — API deployment does not exist.
7. Configure .env and verify it
Create .env beside hello_agent.py. Replace every ***** locally; asterisks are publication masks, not working credentials. The endpoint is the project endpoint copied from Foundry.
AZURE_TENANT_ID=*****
AZURE_CLIENT_ID=*****
AZURE_CLIENT_SECRET=*****
AZURE_PROJECT_ENDPOINT=*****
AZURE_MODEL_DEPLOYMENT_NAME=yantras-luna-model
python-dotenv loads these values into the Python process. It does not create Azure credentials or resources. Our variable names are passed explicitly to the client; they need not match every SDK’s automatic configuration names.
.env
.venv/
__pycache__/
To check configuration without printing values, save and run this as get-env.py:
import os
from pathlib import Path
from dotenv import load_dotenv

load_dotenv(Path(__file__).resolve().with_name(".env"))
names = (
    "AZURE_TENANT_ID", "AZURE_CLIENT_ID", "AZURE_CLIENT_SECRET",
    "AZURE_PROJECT_ENDPOINT", "AZURE_MODEL_DEPLOYMENT_NAME",
)
for name in names:
    value = os.getenv(name, "").strip()
    ready = bool(value) and value != "*****"
    print(f"{name}: {'configured' if ready else 'missing or masked'}")
This confirms presence only, not valid credentials, access, endpoint or deployment. Existing process environment variables take precedence over .env by default; stale shell settings can therefore affect the test.
8. Run hello_agent.py
The following adapts Microsoft’s first-agent tutorial: it loads local configuration and replaces Azure CLI authentication with an explicit service principal. It removes unused API-key variables and checks required settings without printing secrets.
import asyncio
import os
from pathlib import Path

from agent_framework import Agent
from agent_framework.foundry import FoundryChatClient
from azure.identity import ClientSecretCredential
from dotenv import load_dotenv


def required(name: str) -> str:
    value = os.getenv(name, "").strip()
    if not value or value == "*****":
        raise ValueError(f"Set {name} in .env or the process environment")
    return value


async def main() -> None:
    load_dotenv(Path(__file__).resolve().with_name(".env"))
    with ClientSecretCredential(
        tenant_id=required("AZURE_TENANT_ID"),
        client_id=required("AZURE_CLIENT_ID"),
        client_secret=required("AZURE_CLIENT_SECRET"),
    ) as credential:
        async with FoundryChatClient(
            project_endpoint=required("AZURE_PROJECT_ENDPOINT"),
            model=required("AZURE_MODEL_DEPLOYMENT_NAME"),
            credential=credential,
        ) as client:
            agent = Agent(
                client=client,
                instructions="You are a friendly assistant. Keep your answers brief.",
            )
            response = await agent.run(
                "What is the largest city in the United States by population?"
            )
            print(response)


if __name__ == "__main__":
    asyncio.run(main())
python get-env.py
python hello_agent.py
The client sends one short prompt using the deployed model. This local Agent definition does not create a named, server-managed agent in the portal. Keep the endpoint tied to the resource containing your deployment.
“New York City is the largest city in the United States by population.”
Validation status: the real successful run remains pending quota approval and deployment. After testing, replace this illustrative response with the observed result and record the package versions using python -m pip show agent-framework agent-framework-foundry azure-identity python-dotenv.
9. Understand the errors we encountered
| Message | What to check |
|---|---|
| Azure CLI not found on path | The original sample used AzureCliCredential. Our service-principal version does not need Azure CLI sign-in. |
| 403 PermissionDenied | Confirm role assignment to the app or its group at the correct resource scope, membership and propagation. Network restrictions can also deny access. |
| 404 deployment does not exist | Confirm a deployed model exists at the configured resource and the exact deployment name matches. A project alone is insufficient. |
| 429 Too Many Requests | Reduce concurrency and request size, respect retry guidance, and check the deployment’s assigned quota. |
Do not expose client secrets, tokens or private endpoints in terminal screenshots or error reports. Microsoft provides HTTP error troubleshooting guidance.
10. Prepare for the next lessons
Once the smoke test passes, keep this workspace as a foundation for routing, tool use and orchestration experiments. Clone AI Agents for Beginners into a separate course folder using its sparse-checkout instructions:
git clone --filter=blob:none --sparse https://github.com/microsoft/ai-agents-for-beginners.git
cd ai-agents-for-beginners
git sparse-checkout set --no-cone "/*" "!translations" "!translated_images"
This excludes the large translation directories. Follow each lesson’s current setup for additional dependencies, environment names and permissions. A working first-agent example is a starting point; it does not provision every service required by later lessons.
Companion repository
See microsoft-agentic-engineering on GitHub for the companion learning repository. Configuration values shown in this article are illustrative. For security reasons, real credentials, private endpoints and identifiers are not included; sensitive values are represented by *****. Replace them only in your local environment.
References and credits
- Microsoft Agent Framework: Your First Agent
- Azure Python authentication overview
- Local development with a service principal
- Foundry role-based access control
- Create and manage Azure budgets
- Manage model quota
- AI Agents for Beginners course
This article documents Victor Pereira’s learning setup and adapts Microsoft’s examples with attribution. Screenshots reflect the portal seen during the session. Pending steps and sample output are labeled explicitly.